
 Stick and poke tattoos are easy when you have the right tools for the job. Quality tools are both inexpensive and invaluable; they’ll vastly improve your results and greatly lower the risks of infections.
Here’s a list of the tools and materials I use to perform Stick and Poke tattoos. Below, you’ll find a breakdown of each group of tools along with my personal preferences and recommendations.
- Sterile tattoo needle OR standard sewing needle
- Needle support (for sewing needle)
- Dental floss (for sewing needle)
- Tattoo Ink
- Ink container
- Household bleach solution (1:9) OR something to clean your work area
- Medical gloves
- Rubbing alcohol AND alcohol container
- Green soap solution AND/OR witch hazel solution
- Makeup remover pad OR dry wipes
- Medical tray cover OR Paper towel
- Bandage
- Disposable razor (optional)
- Disposable plastic container to throw the needle(s) away
- Standard pen OR tattoo pen
- Tattoo paper (stencil paper)
Interested in trying Stick & Poke tattooing for yourself? We strongly recommend you check out Stick and Poke Tattoo Kit. S&PTK is the leading provider of Stick & Poke tattoo supplies. Their high-quality Stick & Poke kits, complete with instructions are perfect for both learning on silicone skin, and tattooing the real thing! You can find their full range of tattoo kits here. You can also read our review of the product.
Stick and Poke Tattoo Needles
The most common stick and poke tattoo technique, commonly called the “needle and thread tattoo technique” consists in inserting a sewing needle right between a pencil’s eraser and the metal socket. The dental floss is then rolled around the needle to create an ink container. Using a wooden stick rather than a pencil is also an option.

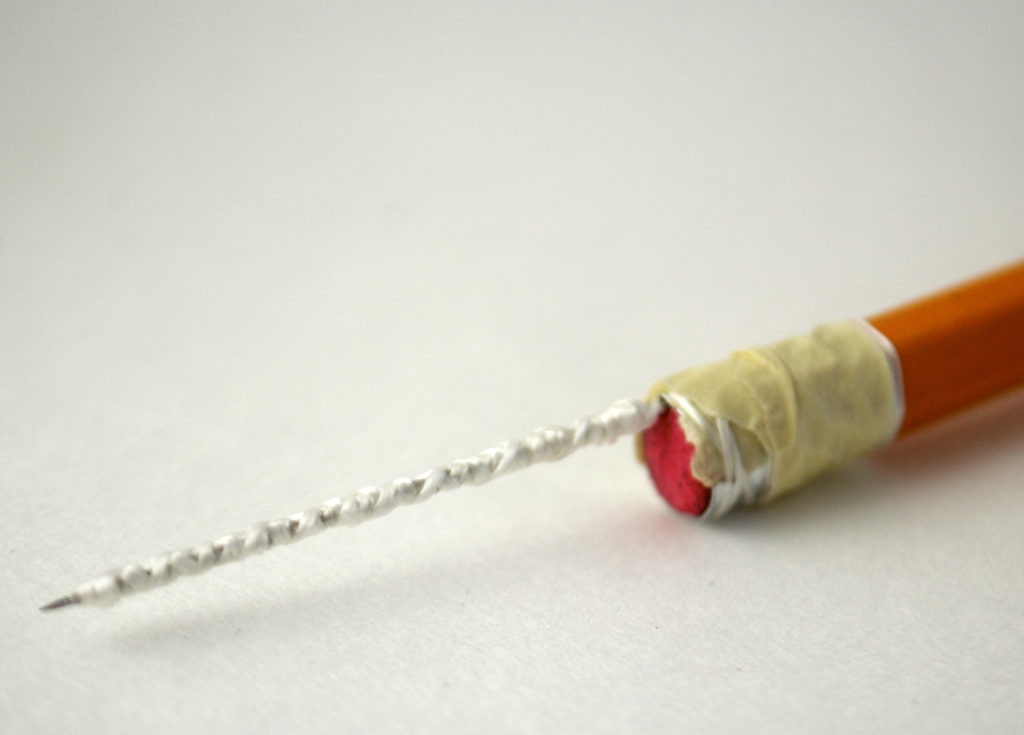
With a careful use of dental floss and proper needle sharpening, you can get away with tattooing using sewing needles. However, these tools aren’t optimal for stick and poke tattoos since they don’t retain ink as well as tattoo needles and aren’t as sharp. Moreover, they are imprecise and less hygienic.
In my experience, the simplest and most enjoyable way to proceed is to use stick and poke tattoo needles. They’re cheap and their multi-pointed tips retain ink well.
Stick and Poke Ink
The best ink for stick and poke tattoos is tattoo ink. It’s safe and gives better results than other commercially available inks. I don’t recommend skipping on high quality ink, as that would affect the quality and safety of your homemade tattoos. The next best choice to tattoo ink is india ink. It’s cheap, non-toxic and less likely to cause infections than pen ink which is, in my opinion, a bad choice.

Ink containers specifically created for tattoos are optional but their tiny size helps minimize ink waste. Since their sole purpose is to contain ink, they are more hygienic. I cover them with rubbing alcohol for ten minutes before using them and I use each container only once.
Click here to read our in-depth article about stick and poke tattoo ink.
Homemade Tattoos Hygiene
Sterilizing your equipment, work area and the skin you will be doing a stick and poke tattoo on is crucial. You should take all measures to prevent infections. To ensure safe tattoos, you should start by learning about bloodborn pathogens, it’s easy and free!
Before preparing your equipment and after completing the tattoo, you should sterilize your work surface. I use a household bleach solution (1 part of household bleach to 9 parts of water) for that purpose.
Wearing medical gloves is an important hygienic measure, and it also prevents staining your fingers with ink. You should wash your hand before and after putting them on. Also, look for medical quality gloves since the pores of their fabric won’t let potential pathogens pass through.
You’ll be using rubbing alcohol to sterilize your equipment as well as the skin of the person you’ll be tattooing. A container is handy to keep the alcohol within reach and to prevent cross-contamination. Tattoo needles come already sterilized.

Makeup remover pads or wipes filled with rubbing alcohol allow you to easily sterilize the skin. You can also use them the remove the excess ink while tattooing. However, green soap mixed with distilled water (1:8) and witch hazel solution are better options in that specific case.
As a hygienic precaution, put all the makeup remove pads (or dry wipes) you’ll need on your working area before starting the tattoo. After the session throw away everything that is still on your working area, even if you have not used it. This will prevent cross contamination.
Paper towels are used to cover your work area in order to have a surface to lay your equipment on. If you are able to get your hands on medical tray covers, go for it! They are very absorbent and therefore the best option.
Bandage is used to protect the skin in the hours following the tattoo. Use any sterile bandage or combine a sterile gauze and medical tape if the area is too large.
You will need a disposable razor if the skin you are tattooing is hairy.
Use a disposable plastic container to dispose safely of your needles. Your container should be puncture-resistant to prevent accidents.
Sketching your Stick and Poke Tattoos

I used to trace tattoos using standard pens, but I find them less hygienic than tattoo pens. I prefer tracing my tattoos by hand, but some use a transfer technique with tattoo paper and green soap. This transfer technique is a great way to improve your tattoo design. When used properly, it allows the tracing to remain on the skin after wiping it. For hygienic reasons, I use each pen only once.
Once you’ve obtained the proper DIY tattoo tools, you’re all set to follow our guide on how to stick and poke!
Leave a Reply